Category: Uncategorized

  • Phone Grip Styles Compared: Expanding Button, Ring, Strap, and Kickstand

    Phone Grip Styles Compared: Expanding Button, Ring, Strap, and Kickstand

    The word “phone grip” covers at least four different mechanisms, and they do not hold a phone the same way, brand the same way, or price out the same way. If you are ordering a few hundred or a few thousand with a logo on them, the style you pick decides how much usable print space you get, whether the grip survives a wireless charger, and what you pay per unit. This is a side-by-side look at the expanding button, the finger ring, the elastic strap, and the kickstand plate, aimed at a buyer specifying a branded run rather than shopping for one at retail.

    The four grip styles and how they actually hold a phone

    The expanding button is the accordion-style grip most people picture: a round top on a collapsible stalk that pops out from an adhesive or magnetic base. You hold it between two fingers, and because the stalk collapses, the same part folds down to prop the phone up as a stand. The finger ring is a metal or plastic loop on a hinged plate; you slip one finger through it and it rotates flat against the back, then folds out to act as a landscape kickstand. The elastic strap is a flat band bonded to a thin baseplate; your fingers slide under the band, and the whole thing sits only a few millimeters proud of the case. The kickstand or wallet plate is a larger flat panel with a fold-out leg, often magnetic, that trades pocketability for a bigger stand and, sometimes, card storage.

    Those mechanical differences matter before you get anywhere near artwork. A grip that a user grabs dozens of times a day has to hold its adhesion and its hinge, and the failure points differ by style: expanding buttons wear at the collapsing joint, rings loosen at the hinge, and straps depend entirely on the bond between band and plate.

    Wireless charging and MagSafe: the compatibility question

    This is the first thing to settle, because it quietly rules out options. A standard adhesive grip stuck to the center of the back will block a Qi charging coil and will not sit on a MagSafe puck. Three ways around it show up in the market. The thinnest, flattest styles, especially elastic straps, can be positioned low on the case so the charging coil stays clear. Removable grips let the user pop the grip off the base to charge, then reattach it. And MagSafe-native grips build the magnet array in, so the grip snaps onto the ring and passes the phone through to a MagSafe charger, or lifts off cleanly.

    If your recipients are the kind of people who charge on a pad or in a car mount, specify a MagSafe or removable design and say so on the product page, because a grip that forces someone to choose between holding the phone and charging it tends to end up in a drawer. Expect a MagSafe build to cost meaningfully more than a plain adhesive one, which the pricing below reflects.

    Branding area and decoration by style

    Print area is where the styles diverge most for a marketer. The expanding button gives you a clean, round canvas on the top disc, usually around a 38 to 40 millimeter circle, which works out to roughly 11 to 12 square centimeters of unobstructed space, ideal for a centered logo. A finger ring hides most of its surface in the loop and hinge, leaving only a small baseplate, so you are often working with a fraction of that. An elastic strap prints along the band and sometimes the plate underneath, a long narrow area that suits a wordmark better than a detailed emblem. A kickstand or wallet plate has the largest flat back of the group and can carry a full-bleed design, which is why it is a favorite for bold, edge-to-edge branding.
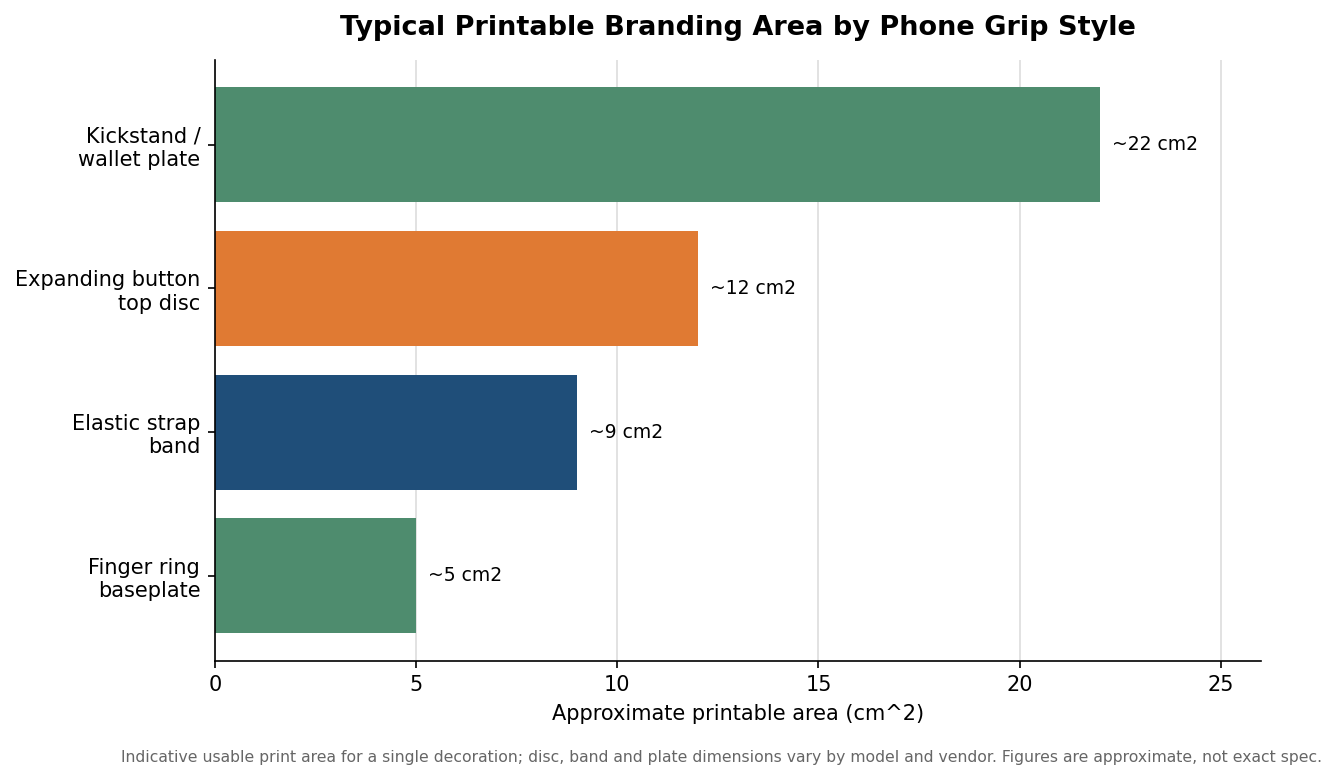
    Horizontal bar chart of typical printable branding area by phone grip style in square centimeters
    Printable area varies widely by style, from small ring baseplates to large kickstand plates.

    Decoration method interacts with these areas. Full-color printing, whether UV or a printed insert under a lens, needs a flat, reasonably large area, so it flatters the button top and the wallet plate. Small ring baseplates and curved surfaces are better suited to a one-color mark or a molded detail. Treat the numbers above as indicative rather than exact, because disc diameters, band lengths, and plate sizes vary from one manufacturer to the next.

    Cost and minimums by quantity

    Custom grips follow the same curve as most promotional products: the per-unit price falls as the quantity climbs, and the decoration and any premium hardware set the floor. The chart below shows indicative US ranges for two tiers, a standard adhesive grip and a MagSafe or authentic-brand premium grip, across common order sizes.
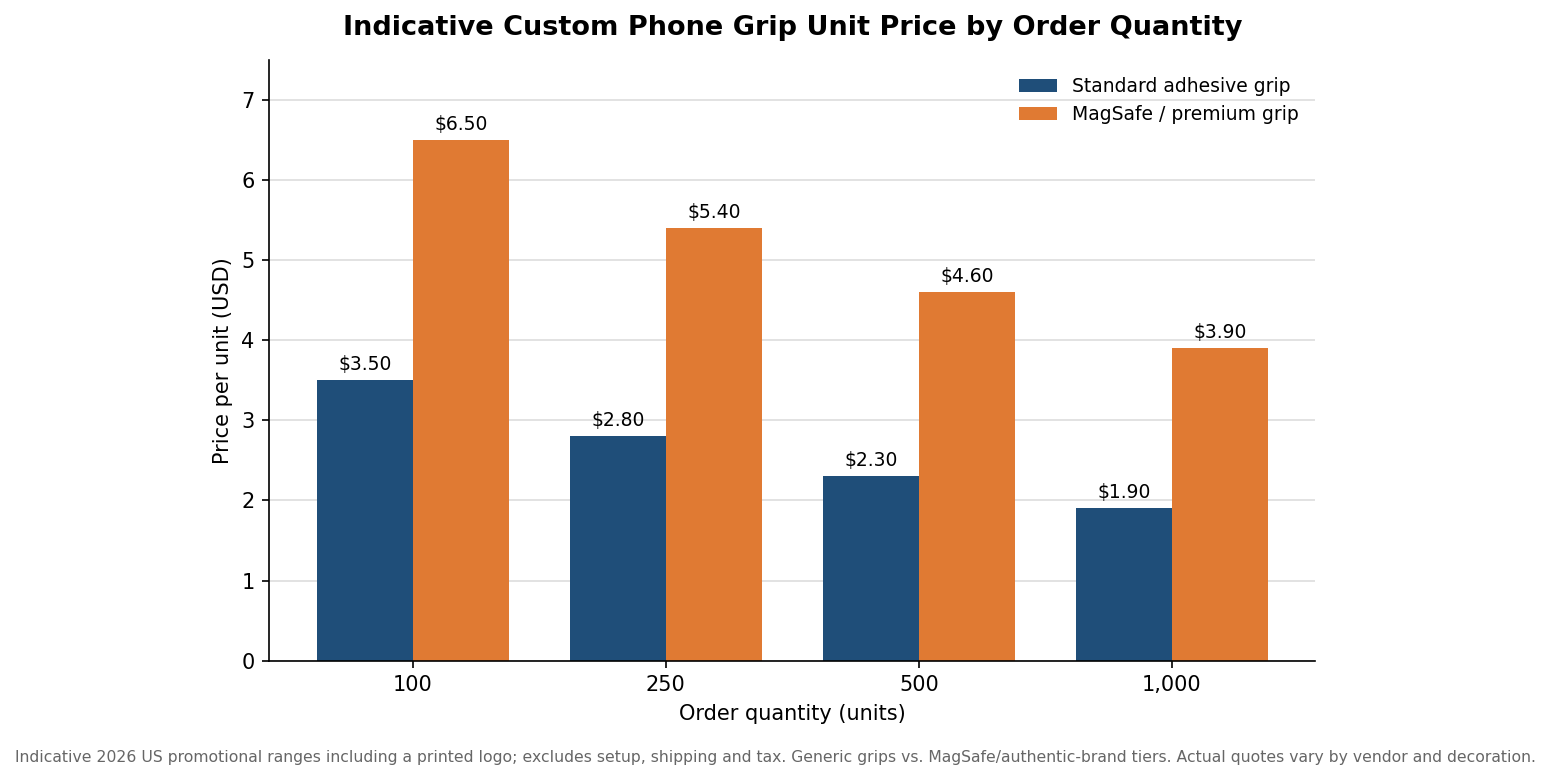
    Grouped bar chart of indicative custom phone grip unit price by order quantity for standard versus premium grips
    Indicative US per-unit pricing falls with quantity; MagSafe and premium grips sit well above standard adhesive ones.

    A few practical notes sit behind those bands. Minimums commonly start around 100 to 250 units for generic grips, and authentic branded platforms often set their floor higher. The first price break usually lands between 250 and 500 units, so if you are hovering just under a break, pricing a slightly larger run is worth doing. Setup or plate charges, full-color versus one-color decoration, and shipping all sit on top of the unit price, and rush timelines carry their own premium. The figures here exclude those add-ons and are meant to frame a budget, not to quote a job.

    Matching the style to the campaign

    Once compatibility and budget are settled, the style almost picks itself from the use case. For a broad giveaway where a recognizable logo matters most, the expanding button’s round top is the safe canvas. For a tech-savvy audience that lives on wireless charging, a MagSafe or strap design avoids the drawer. For premium gifting or a product launch where the packaging and the print both need to look considered, a wallet or kickstand plate gives you the real estate and the perceived value. And for the thinnest, most pocket-friendly option that still adds a hold, the elastic strap wins on profile even though it gives up the stand function. Decide the mechanism first, confirm it survives your recipients’ charging habits, then let the print area and the quantity break guide the final call.
  • How Custom Phone Grips Are Decorated: Sublimation vs. UV Print vs. Vinyl

    How Custom Phone Grips Are Decorated: Sublimation vs. UV Print vs. Vinyl

    On the day they arrive, three custom phone grips printed three different ways can look nearly identical. The difference shows up months later, in a car cupholder or a coat pocket, when one grip’s artwork is still crisp and another has started to peel at the edge or fade. How a grip is decorated, not just what it looks like in the mockup, is what decides whether your logo is still legible after a summer of daily use. For a promotional product whose whole job is to keep a brand in someone’s hand, that longevity is the spec that matters most.

    Three ways a phone grip gets its image

    Nearly all custom phone grips are decorated by one of three methods. Sublimation uses heat to infuse the dye directly into the surface of a rigid acrylic top, so the image becomes part of the material rather than a layer sitting on top of it. Digital or UV inkjet prints the artwork onto the acrylic surface, which gives a very wide color range and the fastest turnaround, usually with a clear topcoat added for scratch resistance. Vinyl decal laminates a thin printed film onto a generic grip base; it is the cheapest route and fine for a short-lived campaign, but the film is a separate layer that can lift over time. All three can look sharp in a photo, so the choice is really about how the image is bonded to the grip, not how it prints on day one.

    Durability is where the methods split apart

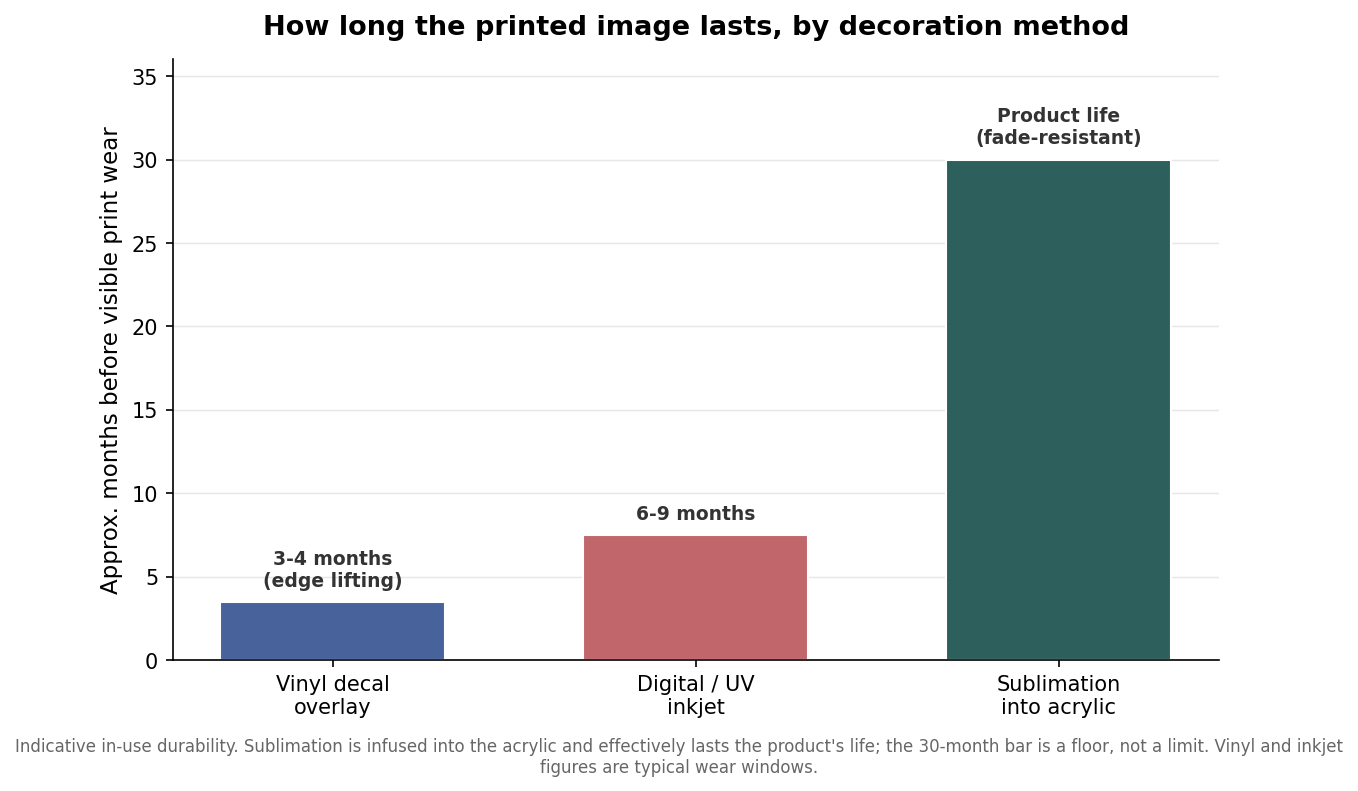
    The gap between the methods is small at first and large over time. Because sublimation dye lives inside the acrylic, it resists fading under UV light and survives the repeated collapse-and-expand cycle of the grip mechanism without wearing, holding up past several hundred expansions. Inkjet prints protected by a topcoat typically look good for something on the order of six to nine months of daily use before the surface starts to show wear. Vinyl decals are the most exposed: the laminated film is prone to edge lifting after roughly three to four months, and it degrades faster near heat, such as a dashboard on a hot day.

    Bar chart of approximate months before visible print wear for vinyl decal, digital inkjet, and sublimation phone grip decoration
    Sublimation infuses dye into the acrylic and lasts the product’s life; decals and inkjet wear far sooner.

    The chart is the case for thinking past the unit price. If a grip is a giveaway meant to last a single event or a single season, a shorter-lived method is not a flaw; it is a reasonable match to the lifespan you need. But if the point is a branded product people keep on their phone for a year or more, a decal that lifts at the edge in month four actively works against you, because a peeling logo reads as cheap. Match the print’s durability to how long you genuinely need the brand to stay visible.

    The base and adhesive under the print

    Decoration gets the attention, but two structural specs quietly determine whether the grip performs. The first is the thickness of the acrylic top. A range of roughly 3.2 to 3.8 mm tends to give the best balance of flex and strength: thinner tops are more prone to cracking, while noticeably thicker ones reduce how far the grip collapses and can make it wobble. The second is the adhesive on the base. A quality grip uses a strong industrial adhesive such as 3M VHB or an equivalent rated to hold under warmth and repeated pulling, which is what keeps the grip from creeping off a phone or case after a few weeks. A beautiful print on a weak base or a poor adhesive is a grip that fails in the hand regardless of how good the artwork is, so it is worth confirming both specs, not just the decoration method.

    What longevity costs

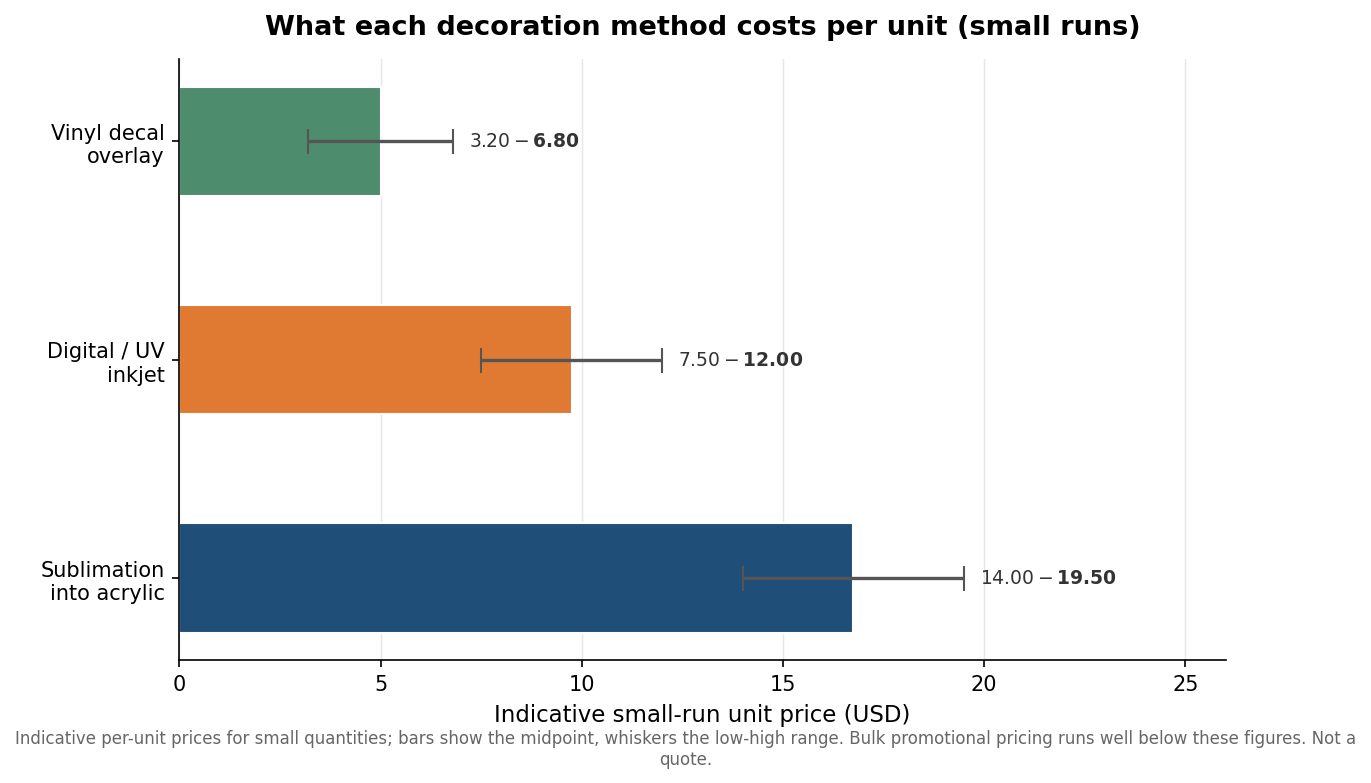
    The methods stack up in cost roughly in line with how long they last. Vinyl decals are the least expensive per unit, digital inkjet sits in the middle, and sublimated acrylic is the most expensive of the three. The figures below are indicative small-run prices to show the relationship rather than a quote, and the gap narrows considerably at promotional volumes, where per-unit costs for any method drop well below single-piece pricing.

    Horizontal bar chart with range whiskers of indicative small-run unit price for vinyl decal, digital inkjet, and sublimation decoration
    Cost rises with durability; the gap narrows at promotional volumes well below these small-run figures.

    Read the price chart alongside the durability one rather than on its own. Sublimation costs the most per piece, but if it lasts the life of the product while a decal needs to be re-ordered or simply looks worn within a few months, the more durable method can be the better value for a keepsake despite the higher sticker price. For a one-event giveaway, the reverse is true: paying a premium for years of fade resistance on something people use for a weekend is spending on a lifespan the campaign will never use.

    Choosing a method for your run

    The decision comes down to how long the brand needs to stay visible and what you are willing to spend to get there. For a short promotional push, a trade-show handout, or a price-sensitive giveaway, vinyl decal or standard inkjet delivers a sharp look at the lowest cost, and the shorter lifespan is not a problem. For retail merchandise, premium event gifts, or anything a customer is meant to keep and use daily, sublimated acrylic protects the artwork for the long haul and looks the part. Whichever method you choose, confirm the base acrylic thickness and the adhesive spec, because those decide whether the grip holds up in daily use no matter how the image was applied.

    The durability windows and prices here are indicative ranges drawn from how these methods behave in general, not fixed guarantees, and actual results vary with the specific supplier, artwork, and use. Treat them as a way to match the method to your campaign’s lifespan and budget, then confirm the details and get a quote for your exact quantity and design. The grips that disappoint are almost always the ones where the decoration outlived its welcome or wore out too soon for the job, and choosing the method by lifespan first is how you avoid both.

  • Will a Custom Phone Grip Stick to Your Case? A Compatibility Guide

    Will a Custom Phone Grip Stick to Your Case? A Compatibility Guide

    Nothing undermines a custom phone grip faster than one that will not stay put. A brand spends on artwork, orders a few hundred grips for an event, and then hears that they peeled off in a pocket by lunchtime. The culprit is almost never the grip itself; it is the surface it was asked to stick to. Adhesive phone grips are only as good as the bond underneath them, and that bond is decided by the phone case, not the grip. Before you finalize an order, it is worth understanding which surfaces hold, which fight you, and what to do when your audience is carrying the difficult ones.

    The single biggest reason grips fall off

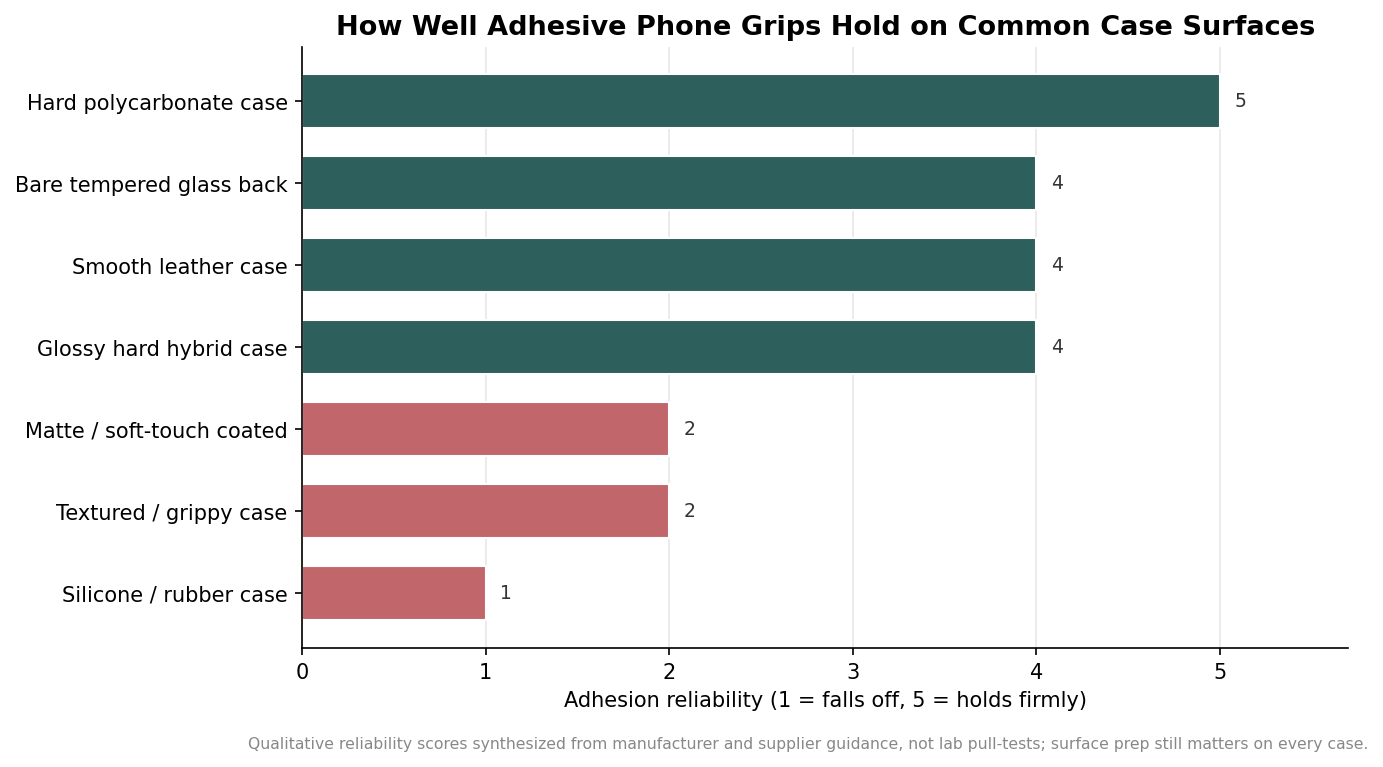
    Adhesive grips rely on a pressure-sensitive adhesive that needs a smooth, rigid, clean surface to grab. The most common failure is the silicone or soft-touch rubber case, which is exactly the kind of case a large share of people already own. Silicone is flexible and naturally oily at the surface, so the adhesive never forms a lasting bond; the case also flexes as the phone is handled, which slowly works the grip loose. This is not a defect in the grip. It is a material mismatch, and it is predictable enough that you can plan around it instead of discovering it after the giveaway.

    Surfaces that hold and surfaces that fight you

    Hard cases are where adhesive grips do their best work. A rigid polycarbonate or hard plastic case gives a flat, non-flexing surface that the adhesive can lock onto, and it is the most reliable target of all. A bare glass phone back or a glossy tempered-glass-backed case also bonds well because glass is smooth and rigid, and a smooth leather case holds better than most people expect for the same reason. The surfaces that fight you are the soft and the rough ones: flexible silicone and rubber, matte or soft-touch coated finishes that feel grippy in the hand, heavily textured or patterned cases, and some coated or water-resistant shells whose slick surface treatment repels adhesive. If your audience skews toward any of those, direct adhesive is the wrong plan.

    Bar chart ranking how well adhesive phone grips stick to hard plastic, glass, leather, matte, textured, and silicone cases
    Hard, smooth cases hold a grip reliably; silicone and soft-touch finishes are where adhesion fails.

    Preparation buys you a better bond

    Even on a friendly surface, how the grip goes on decides how long it stays. The adhesive works best on a surface wiped clean with isopropyl alcohol and allowed to dry, which strips away the skin oils and case-coating residue that quietly weaken the bond. Press the grip down firmly and then leave it alone: most adhesive grips are designed to be pressed once and given time to set rather than repositioned repeatedly, and repeated peeling to adjust placement is a reliable way to kill the adhesive early. As a general rule for pressure-sensitive adhesives, plan on roughly an hour before the grip is put under load and a few days before it reaches full strength, and tell recipients not to test it by yanking it the moment it is applied. It also helps to place the grip in the lower center of the case rather than over a seam, a camera bump, or a curved edge, because any gap under the adhesive footprint becomes the point where peeling starts. Where the grip sits is as much a part of a lasting bond as what it sits on.

    What to do when the case won’t cooperate

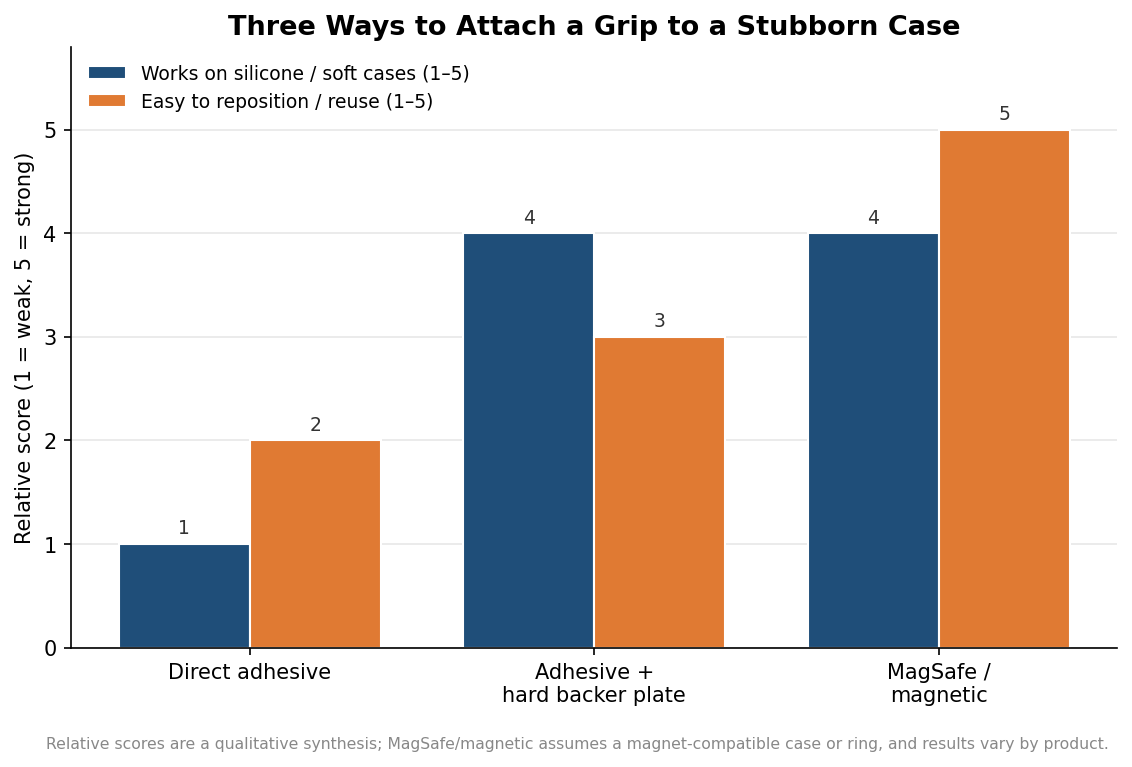
    When your audience carries soft or textured cases, you have three sensible routes, and the right one depends on how the grip will be used. The simplest fix keeps direct adhesive but adds a thin rigid backer plate, an adhesive disc that sticks to the soft case and presents a hard, flat surface for the grip; it rescues silicone cases and makes the grip swappable, at the cost of an extra component. The cleaner modern answer is a MagSafe or magnetic grip that snaps onto a magnet-compatible case or ring and skips adhesion entirely, which also lets the user pop it off for wireless charging and reposition it endlessly. Direct adhesive remains the cheapest and lowest-friction option, but it is the least forgiving on the exact cases most likely to be in the room.

    Grouped bar chart comparing direct adhesive, adhesive with a backer plate, and MagSafe magnetic grips on soft-case compatibility and reusability
    For soft or textured cases, a backer plate or a magnetic grip solves what direct adhesive cannot.

    The comparison above is a qualitative one rather than a set of lab measurements, and the magnetic route assumes the case actually carries a magnet array or ring, so treat it as a way to narrow the choice rather than a final verdict. For a mixed crowd, a magnetic grip covers the widest range of phones without the silicone problem, while a straightforward hard-case audience is well served by ordinary adhesive.

    Specify the surface before you order

    The practical takeaway is to decide the attachment method as deliberately as you decide the artwork. If you are handing grips to a known group on newer iPhones, magnetic makes sense; if you are seeding a broad promotional audience whose cases you cannot predict, either build in backer plates or accept that a share of silicone-case users will need help. Ask your supplier which adhesive they use and whether a magnetic or swappable version of the same printed design is available, because the print is identical across formats and only the base changes. Getting the base right is what turns a good-looking grip into one that is still on the phone a month after the event, doing the quiet advertising you paid for.

  • How to Set Up Artwork for Custom Phone Grips

    How to Set Up Artwork for Custom Phone Grips

    The hardest thing about a custom phone grip is not the printing. It is the size. The decorated face of a collapsible grip is only about 1.5 inches across (roughly 38 mm), which is smaller than a poker chip. A logo that looks crisp on a laptop screen can turn muddy, cramped, or off-center once it is reproduced inside that little circle. Getting the artwork right before you order is what separates a grip people are proud to stick on their phone from one that goes in a drawer. This walkthrough covers how to set up files that print cleanly the first time.

    Start from the real print area, not the whole grip

    A standard collapsible grip has a top button that sits flush when collapsed (about a quarter inch tall) and rises to roughly nine tenths of an inch when extended. The printable surface is the flat top of that button, and across most manufacturers it lands close to a 1.5-inch diameter circle. Treat that circle as your entire canvas. Build your design at final size in a 1.5-inch round frame so you are judging it at the scale a customer will actually see, then keep the important elements away from the very edge. A safe margin of about an eighth of an inch inside the rim protects your logo from the slight drift that happens when a printed disc is trimmed and seated. If your art runs to the edge on purpose, extend the background a little past the circle so there is bleed to trim into rather than a thin white halo.

    Round print areas punish busy layouts. Wordmarks that are long and horizontal shrink to illegibility inside a circle, so a stacked lockup or an icon-only mark usually reads far better at this size. If your brand has a simplified badge or monogram, this is the place to use it.

    Build in vector whenever you can

    Most decorators say the same thing: they accept many file types but prefer vector art. The reason is resolution. Vector files (AI, EPS, or PDF built from vectors) describe shapes as math, so they stay razor sharp whether they are printed on a grip or a billboard. That makes them ideal for logos, type, and flat-color graphics, and it removes any guesswork about pixel density.

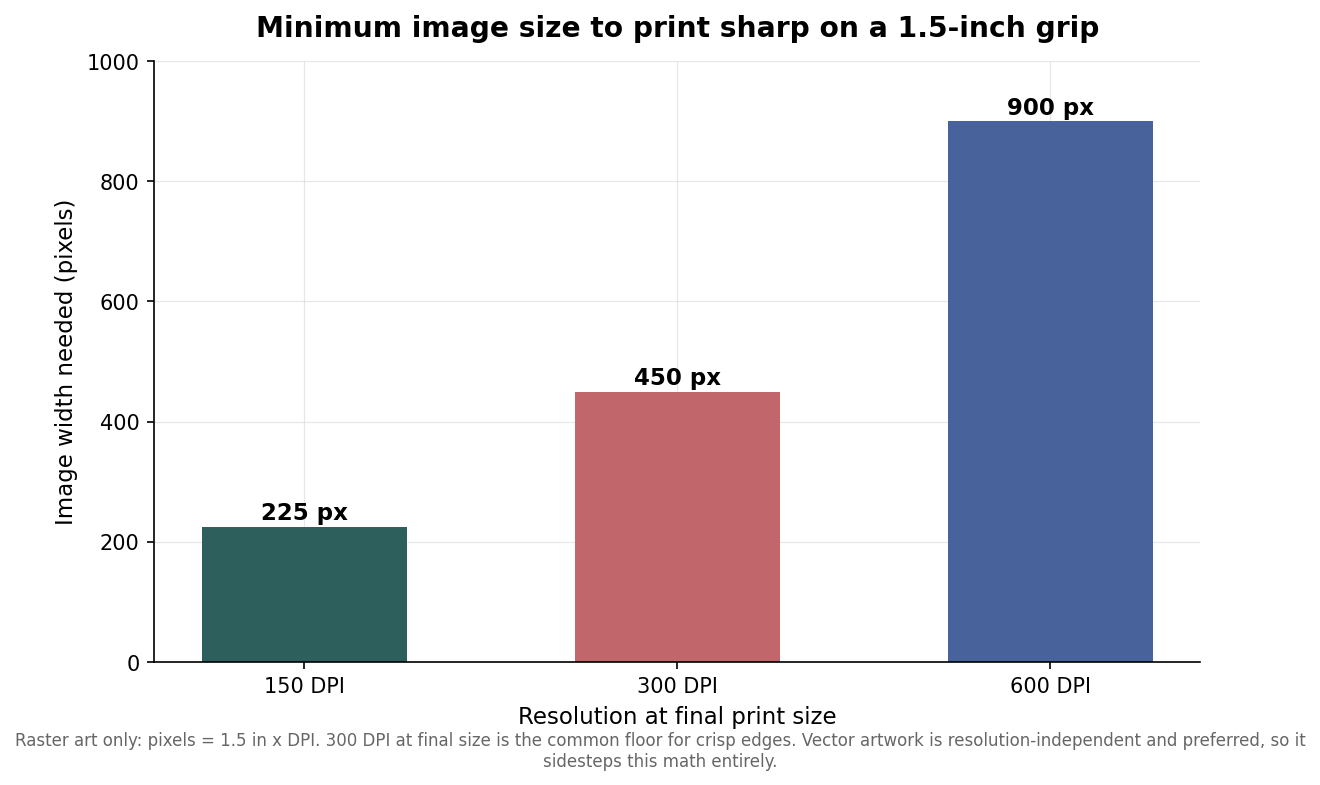
    If you only have a raster file, such as a JPG or PNG, the resolution has to be high enough at final print size. Because the print is only 1.5 inches wide, the math is simple: multiply 1.5 by your target DPI. At 150 DPI you need a 225-pixel-wide image, at 300 DPI you need 450 pixels, and at 600 DPI you need 900 pixels. Three hundred DPI at final size is the common floor for clean edges, so a photo that is at least 450 pixels across in the area that will be printed is the minimum you want to send. A logo pulled from a website at 96 DPI will almost always look soft; ask for the original vector instead.

    Bar chart of minimum image pixel width needed to print sharply on a 1.5-inch grip at 150, 300, and 600 DPI
    For raster art, minimum sharp resolution scales with DPI; vector files avoid the issue entirely.

    Decide how many colors, because it changes the price

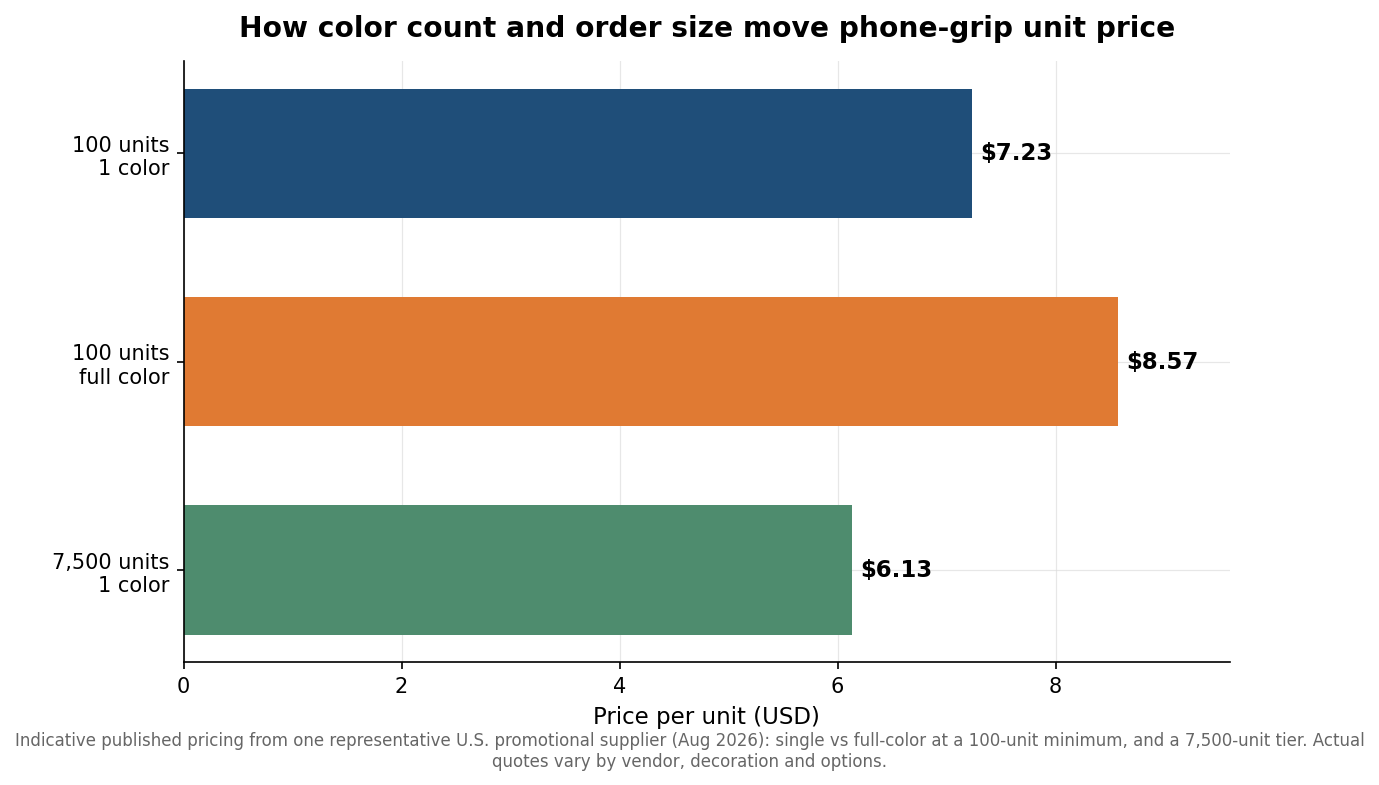
    Color count is the single biggest lever on unit cost for grips. A one-color imprint (your mark in a single ink) is the cheapest route and works beautifully for a clean logo. Full-color printing, which handles gradients, photos, and multi-color artwork, costs more per unit because it is a different process. As a concrete reference point, one representative U.S. promotional supplier lists collapsible grips at about $7.23 each for a single color and $8.57 each for full color at a 100-unit minimum, with the single-color price easing toward roughly $6.13 at 7,500 units. Those are indicative published figures rather than a universal rate, and real quotes move with vendor, decoration method, and add-ons, but the shape holds everywhere: more colors cost more, and larger runs cost less per piece.

    Horizontal bar chart comparing custom phone grip unit prices by color count and order size
    Color count and order volume are the two biggest levers on a phone grip’s per-unit price.

    Set your file up to match the method you are paying for. For a one-color job, deliver the art as a single solid spot color, ideally with a Pantone reference so the ink matches your brand rather than a printer’s best guess. For full color, work in CMYK rather than RGB, since screen colors are brighter than anything ink can reproduce and a vivid RGB blue often prints duller than expected. Converting to CMYK yourself lets you catch that shift before it becomes a surprise on the proof.

    Remember the grip is stuck to a phone

    Artwork is only half the product. Collapsible grips attach with a repositionable gel adhesive that is designed to peel and re-stick, and it bonds best to smooth, hard surfaces such as a hard-shell case or bare glass. It grips poorly on silicone, textured, leather, or heavily water-repellent cases, which is worth flagging to whoever will be handing these out. Because the adhesive covers the back where a wireless charging coil would sit, a stuck-on grip generally blocks flat wireless and MagSafe charging unless you choose a version built specifically to fold flat or mount magnetically. If your recipients live on wireless charging, factor that into which style you order before you finalize art.

    Plan for proofing, quantity, and lead time

    Minimum orders for custom grips commonly start around 100 pieces, which keeps them accessible for a single event or a small team while still hitting a workable per-unit cost. After you approve a digital proof, typical production runs about two to three weeks before the order ships, so a grip you need in hand for a conference should be finalized roughly a month ahead to leave room for shipping and any reprint. Always insist on that digital proof and check three things on it: that your logo sits centered in the circle, that the color reads the way you intend, and that no small text has collapsed at this size. A proof is the cheapest reprint insurance you will ever get, because catching a cramped wordmark on screen costs nothing, while catching it on 500 finished grips costs the whole run.

    Set up the file thoughtfully and a phone grip becomes some of the most cost-effective branded merchandise you can buy: small, genuinely useful, and carried in a pocket every day. Rush the artwork and that same small canvas will expose every shortcut. The work is mostly front-loaded, and it is worth doing before the order, not after.

  • MagSafe Phone Grips vs Adhesive: What Works With Wireless Charging

    MagSafe Phone Grips vs Adhesive: What Works With Wireless Charging

    If you are choosing phone grips to put your brand on, the biggest decision is no longer color or finish. It is whether the grip snaps on with a magnet or sticks on with adhesive. That single choice decides whether the grip works with wireless charging, whether it fits your audience’s phones, and how it behaves in a pocket or a hand. Here is what actually changes between a MagSafe phone grip and a stuck-on one, and how to pick the right one for a branded run.

    Magnetic or stuck-on: the choice that governs everything

    There are two ways a grip attaches to a phone. A magnetic grip snaps onto the ring of magnets built into MagSafe iPhones and Qi2 phones, aligning itself automatically and holding by magnetism alone. An adhesive grip uses a stick-on pad that bonds to the back of the phone or its case and stays there. Everything else, from wireless charging to how easily a customer can move the grip, follows from that difference. The magnetic grip is removable and reusable; the adhesive grip is essentially permanent once it is placed.

    How magnetic attachment actually works

    A MagSafe grip carries a ring of around three dozen small magnets arranged to match the coil layout inside a modern iPhone, roughly 33 millimetres across. When you bring the grip close, it pulls itself into alignment and clicks into place. Because there is no adhesive, the customer can pop it off in a second, move it between devices, or take it off entirely to charge, and it leaves no residue. The catch is compatibility: this only works on phones built for it, which means iPhone 12 and newer, or an Android phone with Qi2 magnets. Older iPhones and most current Android phones have no magnets, so they need either a MagSafe or Qi2 compatible case or a stick-on magnetic ring to work with a magnetic grip, and those stick-on rings hold less reliably once the phone is in motion.

    Wireless charging is where grips get in the way

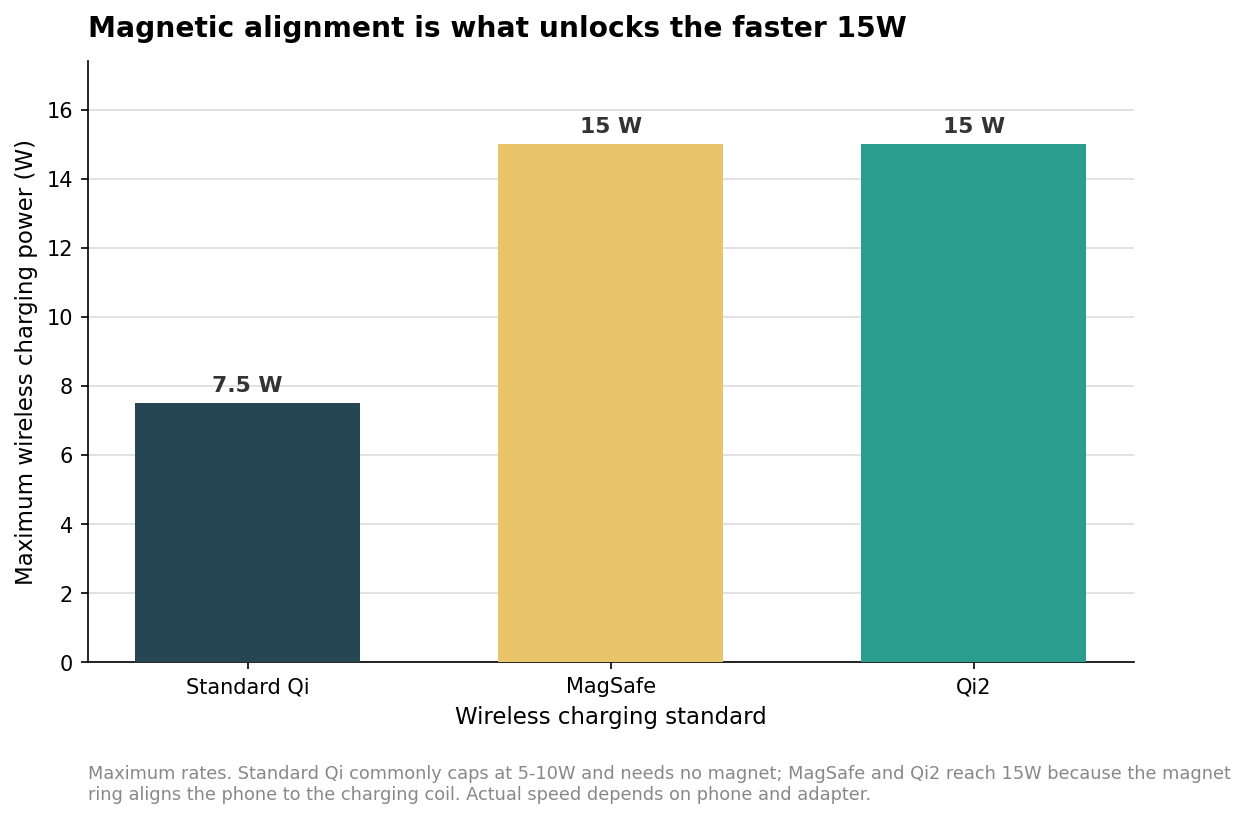
    This is the detail buyers most often miss, and it is the strongest argument for going magnetic. Wireless charging works by lining a coil in the charger up with a coil in the phone, and the magnet ring exists precisely to force that alignment. That alignment is why the magnetic standards hit the higher power ceiling.

    Bar chart of maximum wireless charging power: standard Qi 7.5W, MagSafe 15W, Qi2 15W
    Magnetic alignment is what lets MagSafe and Qi2 reach 15W where standard Qi lags.

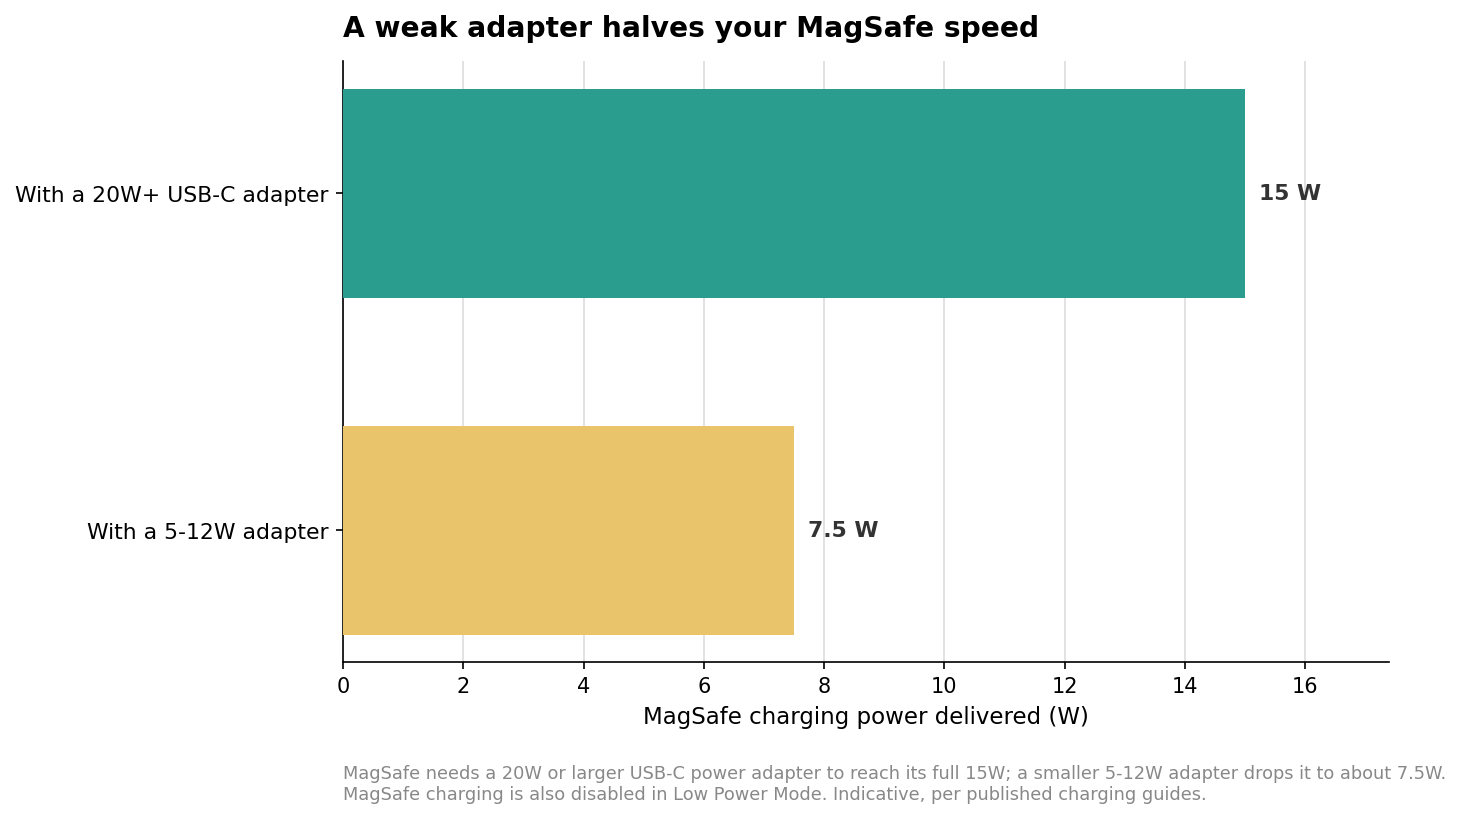
    Standard Qi charging has no magnet and commonly tops out around 5 to 10 watts because the phone can sit slightly off-center. MagSafe and Qi2 both reach 15 watts because the magnets guarantee the coils line up. There is a second gotcha that surprises people: the wall adapter matters. MagSafe only delivers its full 15 watts with a 20-watt or larger USB-C adapter, and a smaller one cuts it roughly in half.

    Horizontal bar chart showing MagSafe delivers 15W with a 20W-plus adapter but about 7.5W with a smaller adapter
    MagSafe needs a 20W or larger adapter for its full speed; a weaker one roughly halves it.

    Now the grip’s role becomes clear. A magnetic grip sits on the same magnet ring a wireless charger uses, so the customer simply pops it off to charge, or in many designs charges straight through it. An adhesive grip stuck in the center of the phone sits directly over the charging coil and blocks it, forcing the customer to peel the grip off or give up wireless charging entirely. Adhesive grips mounted low or off-center, or ones with a hollow charging cutout, can dodge this, but a centrally placed pad and wireless charging do not coexist. For an audience that charges wirelessly, that is a real strike against plain adhesive.

    Grip strength and the motion tradeoff

    Magnetic attachment is not free of downsides. A well-placed adhesive pad bonds hard and does not move, which is reassuring when someone is dangling a phone one-handed over a couch. Magnetic grips hold strongly at rest but rely on magnetic force that can shear loose under active, dynamic movement, and slimmer low-profile magnetic designs give up some of that holding strength for the sake of a thinner build. In practice, magnetic grips are excellent for desk use, propping, and everyday handling, and adhesive grips give a bit more peace of mind for the most active, drop-prone use. Case thickness plays a part too: a thick or textured case puts extra distance between the magnets and the phone, which weakens the magnetic hold, so a customer in a heavy protective case may find a magnetic grip less secure than the spec suggests. If your recipients are hard on their phones or live in rugged cases, that is worth weighing against the charging convenience.

    Which to offer for a branded run

    For custom and promotional merch, the two attachment types suit different goals. Adhesive grips remain the most universal and usually the most economical choice: they stick to any phone or case regardless of brand or age, and their flat top is an excellent, uninterrupted canvas for a logo or full-color artwork. The tradeoffs are that they are permanent once applied and they interfere with wireless charging when centered. Magnetic MagSafe grips are the premium, modern option: reusable, charging-friendly, and satisfying to snap on, but they land best with an audience skewed toward newer iPhones, and they cost more per unit. The deciding factor is who is receiving them. A giveaway aimed at a broad, mixed-device crowd leans adhesive for universal fit and lower cost; a premium gift for a customer base you know is on recent iPhones leans magnetic. Whichever you choose, confirm the print area, decoration method, minimum order quantity, and lead time on a proof before you commit a full run, since those vary by grip type and supplier.

  • A Small Business’s Guide to Phone Grip Margins — Customized Phone Grips

    Call or Text us: (929) 605-4397

    HomeBlog › A Small Business’s Guide to Phone Grip Margins

    Retail

    A Small Business’s Guide to Phone Grip Margins

    06/15/2026

    Phone grips aren’t only a giveaway — plenty of small businesses sell them at the counter, at markets, and online as a low-cost add-on item. Priced right, a branded or novelty phone grip can be one of the better-margin items in a small storefront’s lineup.

    Here is how we see small businesses think through pricing once they move from giving grips away to selling them.

    Understanding your landed cost

    Your landed cost is the per-unit price from your bulk order plus any packaging and shipping you add before resale. At our published range of $2.50–$6.00 per unit at minimum order quantities, a business ordering 250–500 units for retail resale typically lands in the middle of that range once volume discounts apply.

    Setting a retail price point

    Novelty and licensed-style phone grips commonly retail between $12 and $20 at gift shops, campus bookstores, and boutique counters, which puts a landed cost of $3–$4 at a healthy 3–5x markup — comfortably in line with typical small-gift retail margins.

    Bundling for higher average order value

    Some retailers bundle a phone grip with a phone case or a small accessory to lift average order value rather than selling it as a standalone impulse item. Others use a Mirror or Glow-in-the-Dark finish as a premium SKU priced above the standard line, giving customers a clear “good, better, best” choice at the register.

    Order volumeApprox. landed costSuggested retail priceApprox. margin
    100–250 units$5–$6 / unit$15–$18~2.5–3x
    250–500 units$3.50–$5 / unit$14–$18~3–4x
    500+ units$2.50–$3.50 / unit$12–$16~4–5x

    Choosing for your order

    If you’re testing phone grips as a new retail item, order at the volume tier just above your minimum viable test quantity — it costs little more than the smallest run and gives you meaningfully better margin room once you find the price point that sells.

    Key takeawayA landed cost in the $3–$4 range supports a comfortable 3–5x retail markup at typical gift-shop price points of $12–$20.

    Ready to price out a retail order? Get a custom quote — free mockups in 24 hours. Learn more about how we work, or browse more guides.

    More posts

  • How to Order Custom Phone Grips: A Step-by-Step Checklist — Customized Phone Grips

    Call or Text us: (929) 605-4397

    HomeBlog › How to Order Custom Phone Grips

    Ordering

    How to Order Custom Phone Grips: A Step-by-Step Checklist

    05/27/2026

    Ordering custom phone grips for the first time can feel like it involves more decisions than it actually does. In practice, most orders come down to five inputs, and once you have them ready, the whole process from quote to delivery moves quickly.

    Here is the checklist we walk every new customer through.

    1. Gather your artwork

    Vector files (AI, EPS, SVG, or PDF) produce the cleanest print. If you only have a PNG, a photo of a printed logo, or no logo at all, that’s fine — our designers can recreate it print-ready at no charge as part of your free mockup.

    2. Pick a style

    Round and Square are the standard, lowest-cost options and fit most logos well. Choose Mirror for a premium gift, Glow-in-the-Dark for an evening event, or the Wallet Grip Plus Card Holder when you want the giveaway to double as a functional card sleeve.

    3. Confirm your quantity

    Our minimum is 100 units. Round up to your next volume-pricing tier if you’re close to a breakpoint — the per-unit savings usually outweigh the cost of a slightly larger order, and it’s cheaper than a rushed reorder later.

    4. Set your deadline

    Standard production is about 10 business days from an approved mockup. Build in the mockup-and-revision window on top of that, and order at least three to four weeks ahead of a firm event date to leave margin for shipping.

    5. Approve your mockup

    We send a photo-real mockup within 24 hours of your quote request. Revisions are free and unlimited until you sign off — production only begins once you approve.

    StepWhat we need from youTypical turnaround
    ArtworkLogo file or referenceImmediate
    MockupStyle, base color, quantity24 hours
    ProductionYour approval10 business days

    Choosing for your order

    The fastest path from idea to delivered order is having your logo file and a rough quantity ready before you request a quote — everything else, including style and finish, can be worked out during the free mockup stage.

    Key takeawayHave your logo and a rough quantity ready, and order at least three to four weeks ahead of any firm deadline to leave room for mockups and production.

    Ready to start your order? Get a custom quote — free mockups in 24 hours. Learn more about how we work, or browse more guides.

    More posts

  • Do Custom Phone Grips Actually Last? A Durability Comparison — Customized Phone Grips

    Call or Text us: (929) 605-4397

    HomeBlog › Do Custom Phone Grips Actually Last?

    Durability

    Do Custom Phone Grips Actually Last? A Durability Comparison

    05/08/2026

    The most common complaint about cheap promotional phone grips isn’t the mechanism — it’s the print. A logo that flakes, fades, or rubs off within a few weeks turns a giveaway into a liability, since a half-peeled logo reflects worse on a brand than no giveaway at all.

    We get asked constantly how our full-color UV printing compares to the cheaper decoration methods used across the promo industry, so here is an honest comparison of the three most common approaches.

    Sticker-printed grips

    The cheapest phone grips on the market use a printed vinyl sticker applied to a blank plastic base. It is the least expensive method to produce, but the sticker edge is exposed and starts lifting within weeks of pocket friction, and the surface scratches easily since there is no protective layer bonding it to the plastic.

    Pad-printed grips

    Pad printing applies ink directly to the plastic in one or two spot colors, which is more durable than a sticker but limits artwork to simple shapes and flat colors — gradients, photography, and complex logos don’t reproduce well, and the ink still sits on top of the plastic rather than curing into it.

    Full-color UV-printed grips (our method)

    UV printing cures the ink directly into the plastic surface using ultraviolet light, bonding it at a molecular level rather than leaving a layer on top. This reproduces full-color, photo-quality artwork with no color limitations, and the cured finish resists scratching, peeling, and fading far beyond a sticker or pad-printed alternative under normal daily handling.

    MethodColor capabilityDurabilityTypical lifespan
    Sticker-printedFull color, but low qualityLow — edges lift, scratches easilyWeeks to a couple months
    Pad-printed1–2 spot colors onlyModerateSeveral months
    Full-color UV-printedFull color, photo-qualityHigh — cured into the plasticYears of normal use

    Choosing for your order

    If a phone grip is meant to be a disposable, one-event giveaway, a cheaper method may be acceptable. But for any order meant to represent your brand for more than a few weeks — which is most orders — full-color UV printing is the only method built to hold up to daily pocket and bag wear without embarrassing your brand a month later.

    Key takeawaySticker-printed grips look identical to UV-printed grips on day one and start failing within weeks; the difference only shows up after real-world use, which is exactly when it matters most.

    Want a giveaway that still looks good in six months? Get a custom quote — free mockups in 24 hours. Learn more about how we work, or browse more guides.

    More posts

  • Custom Phone Grips for Universities & Student Orgs — Customized Phone Grips

    Call or Text us: (929) 605-4397

    HomeBlog › Custom Phone Grips for Universities & Student Orgs

    Universities

    Custom Phone Grips for Universities & Student Orgs

    04/19/2026

    A phone grip with a school crest or club logo is one of the few pieces of campus swag that survives past freshman year. Students keep the same phone case for years, and whatever is clipped to the back of it rides along the whole time — which makes this one of the highest-visibility, longest-lasting giveaways a department or student org can hand out.

    We work with orientation offices, Greek life chapters, club sports, and academic departments throughout the school year, and the use cases cluster around a few recurring moments.

    Orientation & welcome week

    Incoming-class orientation is the single biggest order window we see from campuses each year. A grip with the university crest or mascot, handed out at a welcome table or tucked into a move-in kit, becomes one of the first branded items a new student owns — and one they’ll likely still have senior year.

    Greek life & club recruiting

    Fraternities, sororities, and clubs use phone grips as a rush-week giveaway that’s more useful (and more likely to be kept) than a flyer or a button. Chapter letters or a club logo on a grip works especially well with our Mirror or Glow-in-the-Dark finishes for a mixer or a themed rush event.

    Athletics & school spirit

    Athletic departments and spirit squads order grips in team colors for game days, alongside T-shirts and other tailgate gear, since the low per-unit cost lets a modest athletics marketing budget reach a much larger student section.

    Campus use caseTypical quantitySuggested style
    Orientation / welcome week500–3,000+Round Phone Grip, school crest
    Greek life recruiting100–500Mirror or Glow-in-the-Dark, chapter letters
    Athletics / game day1,000–5,000+Round or Square, team colors

    Choosing for your order

    Departments with an annual, predictable order (like orientation) tend to lock in a standard design and reorder each year, while student orgs planning a single event lean toward a smaller run with a more novel finish. Either way, order at least three to four weeks ahead of your event to leave time for mockups and standard production.

    Key takeawayOrientation-week orders are the highest-volume campus use case; recruiting and game-day orders do well with a smaller run in a more distinctive finish.

    Planning a campus order? Get a custom quote — free mockups in 24 hours. Learn more about how we work, or browse more guides.

    More posts

  • Matte vs. Glossy vs. Mirror Phone Grip Finishes — Customized Phone Grips

    Call or Text us: (929) 605-4397

    HomeBlog › Matte vs. Glossy vs. Mirror Phone Grip Finishes

    Buyer guides

    Matte vs. Glossy vs. Mirror Phone Grip Finishes

    04/02/2026

    The finish on a custom phone grip changes more than the look — it changes how the logo reads from across a room, how it photographs, and how it holds up over months of pocket wear. We get asked to explain the difference almost daily, so here is the short version.

    All three finishes start from the same full-color UV-printed base, so the comparison really comes down to the surface coating and how it interacts with your artwork.

    Matte finish

    A matte top coat diffuses light rather than reflecting it, which keeps a logo readable under harsh overhead lighting and avoids the glare a glossy or mirror finish can throw under a camera flash. It is the most forgiving finish for text-heavy logos and reads as understated rather than flashy — a good default for a corporate or academic brand.

    Glossy finish

    A glossy top coat makes colors look richer and more saturated, especially with photographic or gradient artwork, and gives the grip a polished, retail-shelf look. It shows fingerprints more readily than matte and can pick up minor glare under bright light, but for most everyday giveaway use that is a minor tradeoff for the color pop it delivers.

    Mirror finish

    Our Mirror Phone Grip swaps the plastic top coat for an actual chrome-style coating, with your logo printed in the center against a reflective ring. It is the most premium-feeling of the three and the one most likely to get picked up and looked at twice, but it costs a bit more to produce and shows fingerprints most readily of the three finishes.

    FinishBest forTradeoff
    MatteText-heavy logos, corporate/academic brandsLeast dramatic look
    GlossyPhotographic or gradient artworkShows fingerprints, minor glare
    MirrorVIP gifts, premium giveaways, social-media momentsHighest cost, shows fingerprints most

    Choosing for your order

    If your logo is mostly wordmark and simple shapes, matte is the safe, versatile default. If your brand leans on photography or rich color, glossy earns its keep. Reserve mirror for the giveaways meant to feel like a genuine gift rather than a bulk handout — VIP clients, top donors, or a limited merch drop.

    Key takeawayMatte is the safest default for text logos, glossy makes color-rich art pop, and mirror is worth the upcharge when the grip itself needs to feel like a gift.

    Ready to pick a finish for your order? Get a custom quote — free mockups in 24 hours. Learn more about how we work, or browse more guides.

    More posts